Quantcast
Channel: Hairlicious Inc.
Viewing all 437 articles
Browse latest View live

Stretching My Relaxer: My Coily New Growth

$
0
0

I'm approximately 12 weeks post relaxer. This stretch was pretty simple i.e. Ikept up with my moisture/protein treatments, protective styled frequently to minimize manipulation etc. Usually throughout my stretch I can never seem to take my hands out of my new growth! I just love the feeling of my kinky coils. It feels so nice between my fingers. I know I'm not the only one :) So I picked up my camera and took a few shots just to see what it looked like up-close. I was shocked to see how coily my curl pattern was. I'm definitely in the 4b range. I fall in love every time I stretch :)

Do you play in your new growth too? How long do you stretch your relaxers for?


How To: My Top Knot Bun

$
0
0


Bunning is one of my favourite quick and easy “go-to” styles. There are various buns that I’ll choose at any given time, but the bun-style that has grabbed my attention lately, is the Top knot bun! This style has been a hot trend lately. It’s sophisticated, chic and I love how quick and easy it is. You can dress it up for a night out or you can dress it down for a messy top knot look – it will still look fabulous!

Check out the steps below on how you can achieve this look:

1. Moisturize and seal your hair. Thoroughly comb your hair ensuring there are no knots or tangles
2. Gather all of your hair to the top of your head (where you want the bun to be placed i.e. crown region) and secure your hair with a ponytail holder. Make sure it’s not too tight.
3. Take your hair in the ponytail and split it in two.
4. Begin to do a loose two-strand twist with your hair.
5. Wrap the twist around the ponytail holder (clockwise) to form a bun. Secure the bun with a few bobby pins to ensure it does not unravel
6. Go over your hair with a 100% Boar Bristle Brush so your hair and edges are smooth and in tack!

That’s it!

I love rocking this style. It’s fun and the bun looks like a sophisticated intricate knot! Enjoy.

Product Haul: Aussie Moist + Aussie 3 Minute + Shea Moisture Manuka Honey & Mafura Oil

$
0
0

So I took a short trip to Buffalo a couple weekends ago for a birthday event. Of course I couldn't leave without getting a few hair goodies! In the pic above, you'll see all the products I picked up in just a few short hours. Did you know what these products have in common? They are NOT sold in Canada (where I live) - period! :(

Back in the day, I used to see Aussie 3 minute miracle at my local Walmart, now this product doesn't exist! I can't find it anywhere. 'Till this very day, I still hear positive reviews about this conditioner. Many ladies use it as a deep conditioner too. Without hesitation, I picked up a few conditioners to last me for a while. I can't wait to try them out during my next co-wash session.

Aussie Moist has always been one of my "go-to" conditioners when co-washing. While strolling the isles of Target, I noticed a new conditioner called "Miraculously Smooth". Sounded tempting so I grabbed it! The ingredients are very similar to Aussie Moist, but this conditioner has Silk and Jasmine extract. 

Last but not least, I picked up the Shea Moisture Manuka Honey & Mafura Oil Shampoo and Conditioner. This line targets dry hair plus the shampoo is colour safe and sulfate-free! I've never seen this line from Shea Moisture at my local Beauty Supply Store. This made me want to try it even more. This line (both shampoo and deep conditioner) is unique as it contains 3 main ingredients: 

1. Manuka Honey - Anti-inflammatory properties soothe the scalp. Helps create a moisturizing barrier.

2. Mafura Oil - High levels of beneficial oleic acid help replenish oils stripped from hair.

3. African Rock Fig - Contains antioxidant Vitamin C, which helps keep hair looking vibrant.

I heard that the deep conditioner is very slippy and great for softening and detangling the hair. Sounds like a win to me! Just had to share :)

Ingredient Spotlight Pt.3: Bis-Aminopropyl Dimethicone

$
0
0
What is Bis-Aminopropyl Dimethicone?

Bis-Aminopropyl Dimethicone is an amine-funcitonalized silicone. Some call it a "water-insoluble" silicone. Typically found in instant conditioners.

What does it do for the hair?

It bonds to damaged areas of the cuticles adhering to the hair strands making the hair feel and look healthier. It creates a light film on the hair imparting   shine, silkiness and body. It provides excellent wet and dry comb-ability. It does not create a build-up on the hair, like most silicones. It is not supposed to accumulate on top of itself after multiple applications - it's not attracted to itself. Removing this ingredient is tricky; therefore; using a sulfate shampoo is key!

Which products contain this ingredient?
  • Herbal Essences Hello Hydration Conditioner
  • Pantene Truly Natural Hair Deep Conditioner
  • Herbal Essences The Sleeker the Butter Smoothing Conditioner
  • Aussie Moist Conditioner
  • Herbal Essences Touchably Smooth
  • Herbal Essences Totally Twisted Curl Conditioner

How To: Twist-out On Relaxed Hair

$
0
0

When I’m stretching my relaxer I like to do low manipulation styles to camouflage my new growth. Twist-outs are fun and playful. They give me just the right amount of volume and wave to spice up my hair. The best part is, they are super easy to do and great for any occasion!

Products Used:


Here’s how I do it: 

Step 1 
I like to moisturize and seal my hair first to lock in moisture. I then part my hair in 5 sections. I apply 1 pump of my favourite foam lotion to each section. Twist it up and clip. Take one section, split it in two (2).

Step 2
I grab one of those sections and begin to two-strand twist all the way down to my ends. I twist each section tightly for more curl definition.

Step 3 
Starting from my ends, I roll the perm rod all the way up to my roots.

Step 4 
I continue to twist my entire head until complete. Each section should have 2 two-strand twists with perm rods on the ends.  I have a total of 10 sections. At this point, I go under the hooded dryer for 15-20mins to allow the foam lotion to set. I throw on my satin bonnet and go to bed.

In the morning, I remove the perm rods carefully, trying not disturbing the curl. I unravel my twists, separate, fluff and go!

Results:


Are you a twist-out fan? What method do you use? 

2014 Wrap Up: Hits and Misses with My Hair

$
0
0

This year came and flew by so quickly; nonetheless, it's been a great year! Even though I'm years into my hair journey, there's always new products, styles, techniques and methods to discover. Sometimes you re-visit products or methods that you never thought to use again...and your hair loves it the 2nd time around - it happens! This year was filled with a lot of hits and just a couple misses (not typical at all). Check them out below :)

Hits ✓:
Misses ✗:

Overall, I've been pretty consistent with my hair care regimen in 2014 and I have a good handle on what my hair likes vs. what it doesn't like. This year, I've found more staples and hair styles that I truly adore for any occasion! Yes, it's great to experiment; however, I try not to stray too far away from "the usual" to avoid any major setbacks. It's all about balance!

What were your Hits & Misses for 2014? 
What styles or techniques did your hair love or absolutely hate this year?

ESSENCE.COM Straight Talk: Are Your 2015 Hair Resolutions Realistic?

$
0
0

As 2014 quickly comes to an end and we reflect on our hair progress throughout the year, it’s important to be realistic when setting new goals for 2015. Setting goals that are congruent with our lifestyle is a key factor for success. Here are a few things to keep in mind when you are creating your goals for 2015.

START SMALL AND BE SPECIFIC
If you want to grow your hair from shoulder length to mid-back length in 6 months, think twice. Remember, our hair does not grow very long overnight! We grow on average ½ an inch per month, which equates to 6 inches a year! Aim to go from shoulder length to armpit length in 6 months to 1 year. Chances are, you’ll reach your goal way before you anticipated!

WRITE IT DOWN
Writing down your hair goals and keeping track of your progress is an excellent way to stay on top of your hair ambitions. Journaling will help you to set your path and you can make adjustments when needed.

EXPECT BUMPS ALONG THE WAY
Expect bumps along the way! You may not achieve your goal on the first try – that’s okay! It will not always be smooth sailing. Trial and error is part of the journey. Without the “hiccups” we experience, we wouldn’t truly understand our hair. Embrace the ups and downs, have patience and most importantly stay consistent!

Be sure to check out the original article over at ESSENCE.com | Straight Talk: Are Your 2015 Hair Resolutions Realistic?

Castor Oil Challenge Part 9 - Coming Soon!

$
0
0

The Infamous Castor Oil Challenge is BACK on Hairlista Inc. by popular demand! Hairlista Inc. will be hosting the 9th Annual Castor Oil Challenge starting January 25th, 2015.

Let's start the year off right with healthier and thicker new growth. Let's go into 2015 with gorgeous hair! The challenge will last for 3 months (ending in April 2015) with a grand prize at the end for those who have retained the most length and/or achieved the most thickness in their hair!

Don't forget to take 'before' pictures as soon as possible. You'll definitely want to see your progress.

With that being said, stock up on your Castor Oil...NOW!

Be sure to check out Hairlista.com for more details! Stay tuned.

My Hair: Half Up Half Down Top Knot

$
0
0

Lately, I've been obsessing over the Half Up-Half Down Top Knot! I just love how chic and playful this style is. It's perfect for hanging out with the girls, going out for lunch or just spending a Saturday at the mall. I love it!! Not to mention ... it's super easy to do! 


The trick to mastering this style is to section off less hair in the front than in the back. You want to have more hair in the back portion than in the front. Less is best! Bring your bun forward (closer to your forehead) for a more dramatic look.

To create my bun, I did my signature Top Knot method by splitting the ponytail in two and then two-strand twisting the hair all the way down to the ends. I wrap the twist around my ponytail holder and pin it down! That's it. 

The back of my hair is wavy due to an old twist-out I was wearing. The waves really helped to enhance the overall look and texture of my hair. Prior to styling, I moisturized with Scurl No Drip Activator and I sealed with Extra virgin olive oil.


Are you a fan of the half up-half down Top Knot? Have you tried it?

Castor Oil Challenge Pt. 9

$
0
0

I'm so ready for this challenge!! The 9th Castor Oil Challenge returns to Hairlista.com Sunday January 25, 2015 until April 25, 2015. As you may or may not know, the Castor Oil challenge is geared towards promoting longer, fuller, thicker hair - something we all desire!

Above, are the details taken from the Castor Oil Challenge group on Hairlista.com. The rules for the challenge have also been posted. I think I may enter the challenge at the Advance level or Extreme level. I haven't quite made up my mind as yet. I have a few days to decide ... so no biggie. I'm all stocked up on my Castor Oil too - I'm excited! 


Wash Day - Soft & Fluffy!

$
0
0

I must say, wash day was a hit and to top it off, I only used 4 products! I started off my session by saturating my strands with by BF aka Coconut Oil. I then went under the steamer for 20 minutes (no plastic cap). 

Lately, I've been trying out a product line that I recently purchased - Shea Moisture Manuka Honey and Mafura Oil Shampoo and Deep Conditioner. I lathered with the sulfate-free shampoo twice. My hair felt so moist and hydrated. The slip is perfect and it rinses out easily. Loved it! My full review will be available shortly. 


I then t-shirt dried for 15 minutes and applied the Shea Moisture Manuka Honey and Mafura Oil Deep Conditioner to my roots, hair and ends. Though I always add oils to my deep conditioners, I didn't add any this time around since I'm still in the testing phase for this product. Just for the record, the deep conditioner works so well without the extra oils, I'm really impressed. So after steaming for 30 minutes, I rinsed and t-shirt dried for the rest of the night while doing things around the house.

I was so impressed with the state of my hair. I didn't experience any tangles or breakage from start to finish and I'm currently 5-6 weeks post relaxer. My hair was extremely soft, fluffy, smooth, hydrated and it felt strong! These products were so good to me, I'm definitely going to post a full review soon. Just looking at my air dried pic, the shrinkage in my hair is so real right now :) 


About an hour later, I followed up with a favourite leave-in conditioner of mine, Kinky Curly Knot Today Leave-in and a little bit of Extra Virgin Olive Oil. This stuff is the truth! I can't believe I was sleeping on this product for so long. My relaxed hair literally felt like butter right after applying it!!  I threw my hair into a simple bun - wash day complete! I love buns #bunlife :)


The Wash Day Experience

ESSENCE.COM Straight Talk: 5 Musts For Healthy Ends

$
0
0
Do you frequently experience dry, rough split ends? Is it taking you a long time to grow your hair past a certain length? Your ends could be crying out for help and you don’t even know it! Our ends are the oldest part of our hair; so it needs extra tender love and care! Retaining length is based on the health of your ends. So, if you’re focused on growing your hair, your ends are #1 priority! Here are a few tips I live-by for maintaining strong healthy ends. 


1. Moisturizing and seal your hair. Dry hair leads to breakage and breakage leads to possible split ends. See the vicious cycle? Finding the right water-based moisturizer and sealing with a natural oil will prevent your ends from splitting and breaking. This will allow your ends to grow and stay full.

2. Don’t be afraid to trim! Split ends cause our hair to appear jagged-y, dull and cause tangles—who wants that? Do not hold on to length just for the sake of having long hair. Healthy hair comes first! Routinely trim your ends on a schedule that works best for you and your hair. I tend to trim my ends every other relaxer.


3. To achieve and maintain healthy ends, protection is key! Protective styling allows me to avoid heavy manipulation, which can cause my ends to fray. As a bonus, since my ends are hidden, I dodge frequent trims! Buns and wigs are my fave!

4. Baggying allows your hair to remain moist by covering your ends or your entire head using a plastic cap! I swear by baggying! It’s a great way to re-hydrate and retain moisture while you’re at home lounging around. My ends love it!

5. Pamper your ends with a weekly dose of deep treatments! Your ends, the oldest part of your hair, tend to experience the most wear and tear. Give your ends the extra TLC it needs to combat breakage and dryness. Apply the deep conditioner to your ends first, and then work your way up to your roots. Don’t forget to use heat. Your hair will love you for it!

Be sure to check out the original article over at ESSENCE.com | Straight Talk: 5 Musts For Healthy Ends

My Hair: Unofficial Length Check

$
0
0

If you follow me on Instagram (@hairlicious) you would have seen my length check photo above. I apologize for the struggle that's taking place in the photo, but that was the best "non-blurry" photo I took while I was on-the-go....LOL. My hair is straighten via blow dryer and flat ironed. I also got my ends trimmed. 

It's been months since I had my hair flat ironed. I missed it :( I think I flat ironed my hair twice last year. That was it!  I absolutely love the sleekness and smoothness of my hair. I'm still maintaining mid-back length. It's crazy the amount of shrinkage I have when I wash and air dry my hair..it so deceiving!  

Strictly ORS Olive Oil products (Sulfate-free shampoo and Replenishing deep conditioner) were used to create this look.  I probably won't flat iron again until my next relaxer i.e. end of March early April and at that point I'll probably flat iron again.

Just wanted to share :)


Wash day - Top Knot Bun + Video

$
0
0

Wash day run-down:

1) Prepoo'd with Coconut oil under the steamer for 20 mins (no plastic cap)
2) Shampoo'd with Creme of Nature Sulfate Free Argan Oil Shampoo (lathered 2x)
3) Deep conditioned with Keracare Humecto mixed with 1tsp of JBCO, 1 tsp of EVOO, 1tsp of Avocado oil, 1tsp of Avocado oil. I went back under the steamer for 30 mins (no plastic cap).
4) T-shirt dried for 15-20mins
5) Applied Scurl No Drip Activator mixed with Kinky Curly Knot Today Leave-in Conditioner.
6) I left my hair to air dry using the scarf method.
7) Moisturized with Scurl No Drip and sealed with Extra virgin olive oil in sections.

I used my trusty staple products this wash day and from start to finish my hair was in heaven! I think the addition of JBCO (Jamaican Black Castor Oil) in my deep conditioner really contributed to the added softness and volume in my hair. Adding JBCO to my DC is part of the extreme levelSince I'm stretching my relaxer, I didn't have to fight with my hair at ALL - my new growth specifically! My comb was free from broken hairs; however, my hair is shedding slightly since I'm in the Castor oil challenge. This is typical hair behaviour when I'm doing the challenge - I'm not concerned.

This top knot is one of my favourite go-to styles. It's so easy to do and takes no time at all to achieve. I love it because it helps to lock in moisture plus the two-strand twist adds a cool visual effect rather than the typical donut bun.

Check out the video below on how I achieved this style:


The Wash Day Experience

Healthy Hair Care Knowledge: The Science of Transitioning - Just Arrived!

$
0
0

Yay!!! It's finally in my possession :) 

If you follow me on Instagram you would have already seen my post about this arriving in the mail. I'm excited to read the latest book by Audrey Sivasothy. She's my favourite Healthy Hair Care author. I absolutely love The Science of Black Hair, I still read it 'till this very day! It's an awesome tool for any hair journey. 

I've flipped through the book and from what I see, it's loaded with pictorial how-to's, product recommendations, ingredient knowledge, tools and techniques that will significantly decrease the "trial and error" most experience in the beginning of their transition. I'm impressed! Though I'm not transitioning anytime soon, I'm anxious to dive into this book!

Do you have this book? Do you plan on getting it? Share your thoughts :)


ESSENCE.COM Straight Talk: Explaining Relaxed Hair vs. Texlaxed Hair

$
0
0

WHAT'S THE DIFFERENCE? Check out the reasons below...

DIFFERENT BALANCE REQUIREMENTS 
Telaxing the hair preserves the protein within the strand, as it’s not broken down completely by the relaxer. Since there is more protein left over in the strand, texlaxed hair tends to crave more moisture as opposed to protein treatments. Relaxed hair benefits from consistent protein treatments to build the integrity of the strands that were weakened by the relaxer. A balance of both moisture and protein is important to maintain healthy hair.

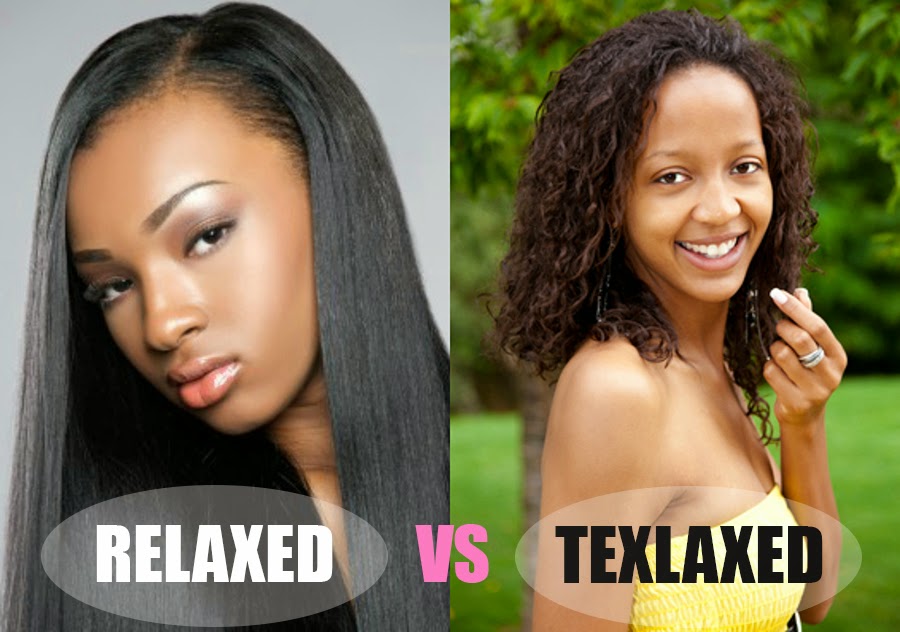
Relaxed and texlaxed hair differs in texture. Texlaxed hair is filled with volume, thickness and of course texture! Texlaxed hair isn’t completely relaxed in order to achieve a fuller thicker appearance. Relaxed hair is just the opposite! Relaxed hair is straighter with fewer kinks in the strands. Due to the differences in texture, each hair type requires care that is unique to its characteristics.

RELAXER
Although both relaxed and texlaxed hair requires relaxers to achieve their style, the amount of time the relaxer is left on the hair varies. For example, when I relax my new growth, I spend approximately 25 minutes applying and smoothing my relaxer whereas someone with texlaxed hair may finish the entire process in 10-15 minutes. Those who are texlaxed omit the smoothing step for less straightness and more texture. The goal is not to get the hair straight but to just to loosen the natural curl pattern.

MANIPULATION 
Depending on the style you chose to wear, both relaxed and texlaxed hair require a certain level of manipulation. Texlaxed hair is easier to comb, detangle, and overall manipulate in sections - preferably while moisturized. Texlaxed hair tends to be thick and highly textured; therefore, sectioning off the hair in 6-8 sections helps to cut down on matting, tangles and breakage. As relaxed hair can be quite straight, putting the hair in sections is not a necessity due to its ease in manageability, though it’s quite helpful.

DIFFERENT NEEDS 
Ladies with texlaxed hair often voice fears of their hair reverting after it’s been freshly flat ironed! Completely understandable! It’s a fact that flat-ironed texlaxed hair can revert back to a kinkier texture if humidity is present in the air. Texlaxed hair, as opposed to relaxed hair, requires an arsenal of anti-frizz and anti-humidity products to help combat reversion while straight. Relaxed hair, though it’s a possibility, rarely experiences this dilemma.

Be sure to check out the original article over at ESSENCE.com | Straight Talk: Relaxed hair vs. Texlaxed hair

Hairlista Castor Oil Challenge Check-in | 1 Month

$
0
0

It's been 1 month since the Castor Oil Challenge began (January 25th) on Hairlista.com. I entered the challenge at the extreme level which requires you to:
  • Apply Castor Oil to your scalp every other day
  • Add 1-2 tsps of Castor Oil to your deep conditioners
  • Seal with Castor Oil, after moisturizing (optional)
My success: I must say, I'm very proud at how consistent I've been with applying my JBCO to my scalp every other night and adding it to my deep conditioners. I tend to apply my oil in the night so that my hair can absorb it while I sleep. However, at the end of the day, when I'm so exhausted, it's such a fight to pull myself into my bathroom and get it done. It's definitely a challenge. So I'm proud of myself for that.


My struggles: The shedding! Though I'm not too concerned with it, I have noticed that it has increased over the weeks. Since I've been participating in the Castor Oil Challenge (dating back years), shedding has always been a symptom of mine. I never get alarmed. I just monitor it and if it happens to get out of control, 99% of the time it doesn't, I'll do a quick Black Tea Rinse and it will begin to decrease. Since I don't remove shed hairs often, that could also contribute to the increased amount of hair I see. I'll keep an eye on it!

Overall thoughts: I'm very pleased with the amount of new growth I'm seeing thus far. It's so soft and fluffy. I haven't run out of any product - thank God! My stash (2 bottles) is still going strong. I think it should last me until the end of the challenge (April). Also, my hair is retaining much more moisture too!! Based on my new growth, I may have to move up my relaxer date :)

Are you in the Castor Oil Challenge? If so, what level? How's your hair doing?

Video: Half Up Half Down Top Knot

$
0
0

This highly requested video is now live! I still obsess over top knot styles because they are so easy to do and they look so trendy! It literally takes a couple minutes to achieve this look, not to mention, you only need a few products to do it.

Check out my video below & get the look!

Oh, for more pictures and info on my Top Knot Styles visit these links:
  1. Top Knot Bun
  2. Half Up Half Down Top Knot

Thanks for watching!

Loving My Relaxed Hair Series™ - Coming Soon

$
0
0

Loving My Relaxed Hair Series™ - love it. embrace it.

If you proudly proclaim to be a member of #TeamRelaxed then this series is for you! 

Loving My Relaxed Hair Series is a new showcase designed to encourage and inspire relaxed ladies to love and appreciate their hair. Just like the Naturalista Series™ that took place on Hairliciousinc.com back in 2010, we are now honouring our relaxed ladies! 

Though many are transitioning to natural, there are tons of ladies who still choose to relax and have gorgeous healthy hair! We want to celebrate you, your relaxed hair, it's health and beauty! #lovingmyrelaxedhair

Each month a relaxed beauty will be featured on Hairliciousinc.com. Each relaxed feature will have the opportunity to share her hair goodies including personal thoughts regarding her relaxed hair, her regimen and hair growth secrets!

Stay tuned!

Video: How I Wrap My Flat Ironed Hair

$
0
0

As part of my nightly maintenance while my hair is flat ironed, I like to wrap my hair to ensure it stays smooth and frizz-free. Wrapping my flat ironed hair prevents me from using additional heat throughout the week. By wrapping nightly my new growth remains straight and I can stretch my flat ironed style for over 1 week. 

Here are the tools I used: 

- Wide-tooth comb
- Boar Bristle Brush
- Satin Scarf
- Satin Bonnet


Thanks for watching!
Viewing all 437 articles
Browse latest View live