Quantcast
Channel: Hairlicious Inc.
Viewing all 437 articles
Browse latest View live

Wash Day: Relaxer Stretch + Castor Oil Challenge Update + Length Check

$
0
0
Air Dried Hair - Stretching Relaxer

Hey loves! It's been approximately 9 weeks since I last relaxed and I'm loving the FULLNESS!! A couple days ago I realized that I only relax 4 times per year (i.e. once per season..winter, spring, summer and fall). Honestly, it sounds so weird saying that because I used to think ladies who relaxed with months in between their relaxers were crazy as it was such an unfathomable task to deal with all that new growth, but lo-and-behold, I'm now one of them :) Alright alright...stretching your relaxers isn't the craziest thing in the world, it just requires patience and the willingness to adapt a different regimen to cater to your new growth and ends - I understand now!

As such, this relaxer stretch has been smooth sailing and I must attribute that to the combination of retained moisture and the Castor Oil Challenge Part 10 on Hairlista.com. I'm participating in the extreme level. My main focus is thickening up my edges, hairline and nape...so far so good. I've been applying the Tropic Isle Strong Roots to my roots before I deep condition (extra soft new growth). I use the Tropic Isle JBCO with Rosemary and massage my hairline, edges and nape. I apply the oils to these areas every other day.

New growth

 On this wash day, I deep conditioned on dry hair overnight (the BEST EVER!!!) with:
  • Keracare Humecto Creme Conditioner
  • Aussie Moist Smooth
  • 2 tsps of Tropic Isle Jamaican Black Castor Oil
  • 1 tsp of Extra Virgin Olive Oil
  • 1 tsp of Coconut Oil
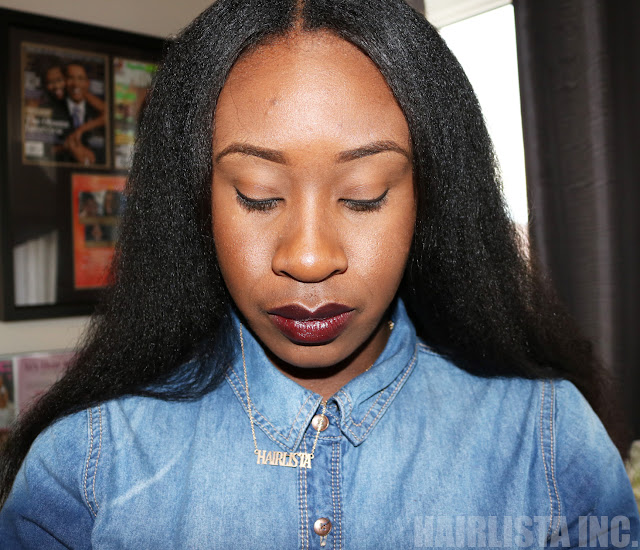
When I woke up, I co-washed my deep conditioner out with more Aussie Moist Smooth. I detangled and then blow dried on cool air with my blow dryer. I grabbed my trusty moisturizer, Scurl No Drip Activator (spritzed my roots and ends) and sealed with Jojoba Oil - my fav combo. Done! I left the house and went straight to the mall LOL :)

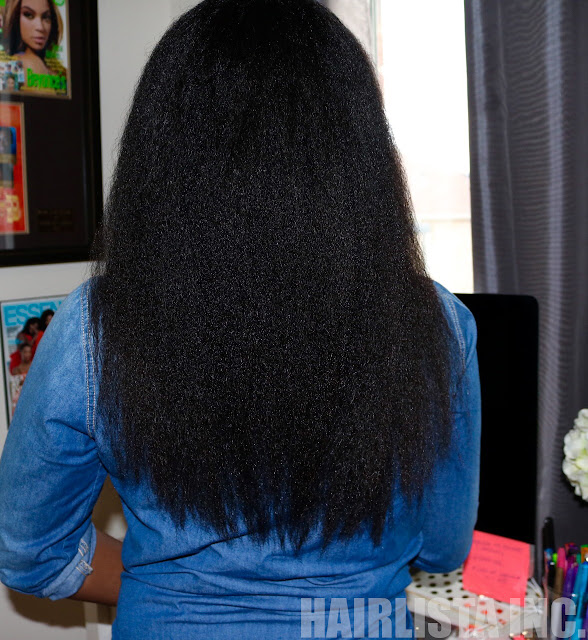
Air Dried Relaxed Hair

I totally recommend deep conditioning on dry hair overnight to ANYONE who is stretching their relaxer, transitioning or suffers from excessive dry hair. I haven't DC'd on dry hair for a while now and it was such a nice re-visit! It is a miracle worker and this process will forever be a part of my regimen - when necessary. My hair is happy :)

Above is my "unofficial" air dried length check. Since my hair is so thick and poofy in most areas, my hair tends to shrink up. Chances are I'm a little past MBL (Mid Back Length) when stretched. I'm not sure if I'm going to flat iron before the year is done - maybe for the holidays?...we'll see :)

The Wash Day Experience


How was your wash day experience? What did you use?


Battle of the Best: Edge Tamer Perfection

$
0
0

I've complied my various edge tamers for a mini review/comparison because, let's face it, there's tons of edge controls, tamers, pastes, glazes etc. but which ones really deliver on their promises? Let's take a look at the pros and cons!

#1 ORS Monoi Oil - Anti Breakage Edge Control Hair Gel  - $5.59 USD/ $5.99 CAD
ORS Monoi Edge Control Gel features healthy omega 3 and omega 6 in addition to antioxidants that protect hair from breakage, leaving hair strong, long, and beautiful.
Pro:
  • Tropical fragrance
  • Thick consistency
  • Slicks down edges
  • Great for fine and/or flat ironed hair
Cons:
  • Temporary hold for kinky/coarse hair
  • Slightly sticky
  • Can form white residue/build-up


#2 Curls Passion Fruit Curl Control Paste - $8.99 USD/ $13.99 CAD
Smooth out and slick down unruly edges, tame, frizzy out of control curls, and add amazing sheen all in one step! Formulated with pure goodness, pure Passion Fruit Oil, Shea Butter & Mango Seed Butter.
Pros:
  • Light fruity scent
  • Thick consistency
  • Medium hold 
  • Adds sheen
  • Great for kinky, coarse natural hair & relaxed hair
  • Moisturizing
Cons:
  • Pricey (depending on where you buy it)
  • Slightly greasy
  • Hold lasts for a couple of hours

#3 Creme Of Nature Argan Oil Perfect Edges - $4.69 USD/ $6.49 CAD
Creme of Nature with Argan Oil Perfect Edges hair gel infused with Argan Oil from Morocco controls and holds down edges, while moisturizing and adding Exotic Shine to the hair. This nutrient- rich formula makes hair stronger and gives superior hold without flaking. Perfect for creating sleek, smooth styles, ponytails, sculpting and styling the hair. Great for natural & relaxed hair!
Pros:
  • Mild Argan oil fragrance
  • Soft consistency/spreads easily
  • Great shine
  • Soft hold
  • Good for fine hair, flat ironed hair, freshly relaxed hair etc.
  • Moisturizing
  • No residue/build up
  • Inexpensive
Cons:
  • Temporary hold for kinky/coarse hair

#4 Eden Body Works Coconut Shea Control Edge Glaze - $8.49 USD/ $20.00 CAD
Coconut Shea Control Glaze Edge Gel provides a firm, manageable hold along the hairline and/or hair shaft to preserve desired styles. Lightweight formula will not create build-up.
Pros:
  • Fresh Coconut scent
  • Firm/tight hold that lasts for long periods
  • Great for kinky natural hair and relaxed hair (type 4) styles i.e. high puffs, ponytails, buns etc.
  • Adds sheen
  • No build up
Cons:
  • Expensive if purchased in Canada


#5 ORS Olive Oil Edge Control - $4.99 USD/ $5.99 CAD
Organic Root Stimulator Olive Oil Edge Control™ is a unique alcohol free formula that gives the hair superior hold without flaking. It slicks and holds down the edges while adding shine and moisture.
Pros:
  • Fresh fruity fragrance (lasts all day)
  • Thick consistency
  • Firm/tight hold that lasts for long periods
  • Great for kinky natural hair and relaxed hair (type 4) styles i.e. high puffs, ponytails, buns etc.
  • Inexpensive
Cons:
  • Can form white residue/build up if applied to unclean hair

And the Edge Tamer Winner is......Eden Body Works Coconut Shea Control Edge Glaze! I've fallen in love with this edge tamer over the past several months. It slicks, smooths and tames my type 4 edges without build up and it lasts longer than the average edge tamer product.  The only downfall is the price ($20.00 @ HoneyFig.com) for us Canadian Hairlistas. I bought mine in the US, so it was cheaper but hopefully the price will change. Side note: I'm still a lover of my ORS Olive Oil Edge Control, but the EBW Control Edge Glaze has won my heart over.


What is your favourite edge tamer? and Why?

Holiday Hair Wish List - My 5 Must Haves!

$
0
0

Happy December Hairlistas!! So the countdown to Christmas has officially begun and I'm excited :) Not only do I have my wishlist ready with a few goodies I cannot wait to try, they are also all under$30.00. These items are affordable and will pamper any Hairlista with fab Holiday hair. Check'em out!

1. Tress Guard

Are you a healthy hair fanatic? You love bone straight hair but not interested in the possible damage direct heat can cause on your hair? Same here!! Well Tress Guard has developed a silk barrier between your hair and flat iron that will protect your hair from the heat. Clever huh? Now I can enjoy guilt free heat-styled hair over the holidays!

tressguard.com - $19.99

2. Shea Moisture Jamaican Black Castor Oil Strengthen, Grow & Restore Treatment Masque

Not only has this masque accumulated rave reviews but it contains JBCO and I’m a huge fan - as you should know! This masque is designed for chemically processed hair as it restores strength, moisture and, as a bonus, the peppermint oil will tingle your follicles helping to promote growth! I’m sold!

sheamoisture.com - $12.99


3. Hercules Magic Star Jumbo Rake Seamless Comb


If you haven’t heard by now, seamless combs are the way to go! Because of the way Seamless combs are designed, they help to reduce shed hairs, split ends and breakage when combing – leaving more hair on your head! It’s perfect for detangling long or short hair - safely. It’s definitely a “must-have” item for me.

hotcombs.net - $19.50

4. Hicks Total Transformations Hicks Edges Gel
Everyone wants edge perfection when styling they’re hair for a sleek smooth look. No need to look further! I’ve been “eyeing” this edge tamer for a while and from all the reviews I've heard, it seems to live up to its promises providing a firm hold and super shine without flakiness or residue. Count me int! I'm all about flawless edges for the holidays!

amazon.com - $12.99

5. Hot Head Deep Conditioning Microwaveable Heat Cap


I’m a champion for regular deep conditioning sessions but if you’re always on the go like me i.e. doing house chores, cooking, cleaning etc. then this heat cap needs be an item on your Christmas hair wish list, too.

Hot Head Heat Cap is a handmade terry cloth microwaveable heat cap with renewable flax seed that will generate heat when warmed. Just simply pop it into the microwave for a few seconds and put it on your hair for 30-45mins for gentle moist heat.

Gone were the days of cords, plug-ins and outlets.  Why not be set free and have fabulous healthy hair while doing it!

etsy.com - $29.95

What's on your Holiday Hair Wish List this year?

Video: Irresistible Me Clip In Hair Extensions Install + Review

$
0
0


The lovely people over at Irresistible Me sent me these hair extensions to "test run" and see if I liked them. Truth be told, I've never worn clip in hair extensions before. I was slightly hesitant to try them out as the texture was silky and shiny, which is the opposite of my relaxed hair. 

After installing the hair clip ins in my flat ironed hair (6 clip ins total), my initial thoughts and reservations quickly disappeared! I was so impressed at how well they blended in with my hair and how easy it was to install/remove.

Not to mention, the clip ins were tangle free and light weight - my hair didn't feel weighed down; however, it added extra body/fullness to my relaxed hair!

Here are the details on the hair:
  • 100 % Royal Remy Human Hair
  • 1B Natural Black
  • 18" inches in length
  • 200g of Thickness
Here are a few photos on the packaging and the difference sizes I used in my hair.


Check out my first impression video on my how I install them:


As a treat, use the discount code below and you'll get 10% off your purchase of the Irresistible Me 100% Royal Remy Human Hair Clip In Hair Extensions :) Enjoy!

Discount Code: IrresistibleHairlicious

Visit: http://bit.ly/IM_Hair1505

Have you tried clip-ins before? Do you like them? Let me know your thoughts :)

5 Ways To Get Your Hair Winter Ready - Winterize Your Hair Regimen

$
0
0
Protect your hair this Winter with a few of my favourite tips from my "Winterized" hair regimen!


1) Increase & intensify your deep conditioning sessions
Amp up your conditioning sessions this season by deep conditioning for 30-45 mins long using a heat source i.e. steamer, heat cap or hooded dryer. As an extra treat for your tresses, add some penetrating oils (olive oil, coconut oil, avocado oil) to nourish and strengthen your hair and scalp.

2) Use Heavier Sealants
Provide your hair with an extra layer of protection by sealing with a thicker oil. Sealing with a thicker oil after moisturizing will lock in moisture for longer periods of time helping to maintain the integrity and health of your ends.

3) Hide Your Hair
Shield your hair from the harsh winter weather and tuck it away! Frequent exposure to winter weather may create dryness and split ends which will lead to breakage. Opt for styles where your ends aren't exposed to the elements i.e. Buns, updo's, weave, wigs, braids etc.

4) Wear Satin Lined Hats
Brisk weather can dry out your hair quickly! Invest in a satin lined winter hat to protect your hair and combat dryness.

5) LOC/LCO method
Preventing moisture loss is essential when combatting dryness. Using liquid, oil, cream or liquid, cream, oil layering method, for locking in moisture, will ensure your hair remains hydrated for longer periods of time during this dry winter season.


What are you doing to protect your tresses this winter season?

Castor Oil Challenge Part 10 Results - My Edges Are Coming Back!

$
0
0


Where O' Where have my edges gone? Correction - just the right side! Hairlistas, I must confess, my edges on the right side has slowly thinned out without me even noticing. It was only until one random day in early September 2015, I noticed that my edges on the right side was so see-through. I was shocked, scared and worried all in one breath. I had no idea what may have triggered it, maybe stress? tight bunning? Who knows! With that being said, I was quickly inspired to start the Castor Oil Challenge Part 10 with the goal of growing out my edges, hairline and nape in 3 months (September - December 2015). 

I joined the Castor Oil Challenge at the Extreme Level which required participants to:
  • Apply Castor Oil to the scalp every other day followed by a scalp massage (2-5mins focusing on damaged areas)
  • Adding 1-2 tsps to a weekly deep conditioner

Because I designed this challenge to be "open", meaning participants could use any mixture of Castor oil they desired i.e. Castor oil with coconut oil, Castor oil with Rosemary etc. as long as it had Castor oil in it, I opted for the Tropic Isle Living Strong Roots Red Pimento Oil and the Tropic Isle Living Jamaican Black Castor Oil with Rosemary - instead of pure JBCO. This combination seemed much more rigorous in promoting hair growth.

I mixed the two products together to form 1 oil that I would apply to my scalp/edges/hairline every other day. I'm happy to say that I was quite disciplined in sticking to my regimen. I oiled and massaged my edges for 2 mins with the pads of my fingers in circular motions.

Here are my "Before" and "After" pictures:


It's much fuller and stronger than before. It doesn't feel fragile like before either. Please excuse my hair in the December photos - I took down two flat twists so my hair was slightly wavy in the front. Now I can grab the hairs on the right side easily as it gathers together better in my fingers. 

Moving forward, I plan on doing loose buns and wearing my hair down more to lessen any possible strain on my edges (both left and right). Though I'm not where I want to be yet with the overall look of my edges, there is still more work to do, this is progress! I guess this what hair journey's are all about :)


How was the Castor Oil Challenge for YOU? Share your experience below.

If you haven't already, post your "before" and "after" photo in the Castor Oil Challenge forum on Hairlista.com

or send your #castoroilchallengepart10 photos to: progress@hairlista.com


Video: How I Moisturize and Seal My Relaxed Hair

$
0
0


Here is a NEW video on how I moisturize and seal my 4B relaxed hair. I'm 12 weeks post relaxer in this video. I've been moisturizing and sealing my hair in sections for years. Since I started moisturizing in sections, my hair has become healthier and I retain length easier. Moisturizing in sections ensures no hairs are missed and my strands are hydrated thoroughly.

A few Hairlistas have asked me if my hair get's "wet" after using Scurl No Drip to moisturize my hair; however, my hair remains moist without the "wet" feeling. My hair type seems to respond well to glycerin based products.


Thanks for watching!!

Then and Now: My Bun Comparison!

$
0
0

Am I the only one who loves to dig up old hair photos to compare the past to the present? :)

Honestly, there's nothing like an old photo to show you how much your hair has transformed over the years! I was digging through my archive of photos and I came across this old photo of my bun back when I started my hair journey (on the left). This photo was taken approximately 1 year into my hair journey - so my hair was becoming healthier.

Seeing this photo, years later, brought back so many memories/thoughts/feelings I was experiencing with my hair, at the time. On many occasions "giving up" ran through my mind, but I'm glad I didn't. These "blast from the past" photos remind me that, I know it sounds cliche but, patience and consistency is everything!!

Never give up!


2016 is Here - Happy New Year!!

$
0
0

Let's have a New Year filled with ....

New Hair Goals
New Hair Styles
New Hair Videos
New Hair Techniques
New Regimens
New Hair Products
New Comparison Photos


Happy 2016 Hairlistas :)

Blessings to you and your family!!


Castor Oil Challenge Part 10 Winners!!

$
0
0


Start date: September 19th, 2015
End Date: December 19th, 2015

This challenge included 5 levels for challengers to participate in: Basic, Intermediate, Advance, Extreme and Ultimate! The challenge was a ton of fun and such a success! Thank you to EVERYONE who took the time to participate. I appreciate you!!

I'm proud to announce the winners of the Castor Oil Challenge Part 10

Winner #1


Hairlista Profile Name:Klassy_kandi
Participation Level: Intermediate Level

Challenge Requirements:

Apply Castor oil to scalp twice a week followed by a scalp massage (2-5mins focusing on damaged areas).
Winner #2


Hairlista Profile Name: Yolanda
Participation Level: Ultimate Level

Challenge Requirements:
  • Apply Castor oil to scalp every other day followed by scalp massage (2-5mins focusing on damaged areas).
  • Add 2 tsps to weekly deep conditioner. 
  • Seal ends with Castor oil mixed with another carrier oil (optional).


This year we did something NEW and different by bringing the Hairlista Castor Oil Challenge to Instagram! The challengers had to upload a video sharing their progress while using the hashtag #castoroilchallengepart10 on their Instagram photos!


 The Castor Oil Challenge pt. 10 Instagram Winner is....


Hairlista Profile Name:Shynea
Instagram: @TheRealShynea

Challenge Requirements:
  • Apply Castor oil to scalp every other day followed by scalp massage (2-5mins focusing on damaged areas). 
  • Add 1-2 tsps to weekly deep conditioner.

Congratulations Ladies on your awesome progress in just 3 short months!!!You've done an excellent job.

Prizes: Our friends over at Tropic Isle Living have been so generous to provide our winners with healthy hair care gift baskets to further promote their healthy hair growth. Enjoy ladies!

Winner # 1 & #3 will receive the Permed Hair Care System:

Shampoo · Conditioner · Protein Conditioner · Jamaican Black Castor Oil · Coconut Hair Food


Winner #2 will receive the Natural Hair Care System:

Shampoo · Conditioner · Protein Conditioner · Jamaican Black Castor Oil · Hair Food


Huge thanks to everyone who participated in the challenge! Your effort and support is truly appreciated :)

My MAIN Hair Goal For 2016! - What's Yours?

$
0
0


Setting a hair goal for the year is extremely important but also incorporating the right steps to take you to the next level is vital! My goal this year is to keep things super simple and focus on regrowing my edges (moreso the right side, its a tad bit weaker)...yup that's right! Just my edges and maintaining the overall health of my hair - of course!

Length is not my main focus because I've learned that while maintaining healthy hair, length will always come. No need to fixate on it. Besides, I have no real desire to go past MBL. I've been MBL for years and it's my sweet spot :)

As for my edges, I plan on relaxing them every other relaxer to ensure they remain strong and full. I relax 4x/year. Relaxing my edges only 2x/year will be a challenge but the health of my hair is more important for obvious reasons. I love me some slick edges.

When I do plan on relaxing, my plan is to only apply the relaxer onto my hairline + edges at the very end - no smoothing! I believe that over the years excessive smoothing during the relaxing process and bunning may have attributed to my edges (the right side) becoming thinner. Once I pair my "relaxing my edges only 2x/year" regimen with loose bunning, I should be on the right track :)

So here are the mini changes I'll be making:
  • Massage my edges and hairline 2-3x/week with Jamaican Black Castor Oil
  • Wear loose protective styles
  • Relax my edges every other relaxer (2x/year) 
I must admit that finding hair styles to help blend my "unrelaxed" edges with my freshly relaxed hair may be a challenge, but I'll just have to experiment and see what works. Once my new growth fills in, it should be a breeze.

Since joining the Castor Oil Challenge part 10 on Hairlista.com,  I've noticed a huge improvement and it seems to be filling in well. I'm going to continue my Castor oil regimen by applying my JBCO 2-3x/week followed by a light massage. I just have to be consistent, put in the work and be patient.

What are your 2016 Hair Plans? Do you have a specific goal in mind? How do you plan on getting there?

Video: Kate Spade 2016 Planner Review

Product Haul: I Got My Holiday Hair Wish List Goodies!

$
0
0

If you remember back in December I did a Holiday Hair Wish List post....well I'm excited to say that my wishes came true - with the exception of the Tress Guard! 

I cannot wait to try all of these products/items out :) I feel like a kid in a candy store. They will fit effortlessly into my weekly regimen. Product reviews and first impressions will come soon.

Just had to share!!

When was your last hair product haul? What kind of goodies did you get?


Natural Beauty Hair Boutique - Natural Growth Butter

$
0
0

Promises: Conditions, softens, and strengthens hair all while soothing the scalp and stimulating hair growth. Not just for thinning edges, can be used all over for complete hair growth.

Directions: Apply daily to scalp and massage for 30-60 seconds for best results. Can also be used all over as a hair moisturizer. Safe for children. All NATURAL.

Ingredients: Shea Butter, Aloe Vera, Castor Oil, Jojoba Oil, Hemp Seed Oil, Wheat Germ Oil, Grapeseed Oil, Glycerin, and Coconut Oil.


Truth: This growth butter has been a wonderful addition to my regimen. I love the scent, it's so fresh yet mild to the senses. The rich oils mixed with Shea Butter has really helped to lock in moisture during these harsh winter months. My hair responded to it better as a sealant rather than a moisturizer as it lacks water as an ingredient. The combination of ceramides, humectants, and strengthening oils really make this growth butter stand out from others - this is why I started using it as a sealant! I love the soft "whip" consistency, it melts perfectly into my hair, new growth and ends. Since I've been using the NBH Growth Butter, I notice my ends feeling slightly stronger (I baggy with it).  I'm attributing this new found strength to the aloe and coconut oil mixture - great combo! Though it promises hair growth for thinning edges in as little as two weeks, I haven't been applying it consistently to my edges.  I plan on using the butter, for the growth of my edges, until my next relaxer for results :)

Pros:
  • Creamy consistency
  • Easy to apply (spreads easily onto the hair)
  • Fresh lemon scent  (mild)
  • Locks in moisture
  • Great for LOC/LCO Method
  • Little goes a long way
  • Can be used on Natural and Relaxed hair (adults and children)
Cons:
  • Not a moisturizer

Price: $15.00 USD

Hairlicious Rating:   (5/5) Excellent 

Video: 3 Quick Styles For Old Flat Ironed Hair

$
0
0


Hey Hairlistas! 

In this video I share with you how I "dress up" my old flat ironed hair. In the video my hair was 7 days post flat iron. Usually around 5-7 days my flat ironed hair tends to look a bit dull. Adding these cute accessories and a simple flat twist adds life to my hair allowing me to stretch-out my flat ironed style a bit longer.

Thanks for watching!!

Items/Products Mentioned: 

Goddess Hair/Head Chain: http://amzn.to/1NXPNtf
Two braids Black and Gold Headband: http://amzn.to/1UUOPDw
Hicks Total Transformation Edge Control: http://amzn.to/1NXQ27t


What styles do you like to do on old flat ironed hair? Do you like to wear hair accessories?


Heatless Curls On Flat Ironed Hair

$
0
0

What's the best "go-to" style when you're tired of your oldlimp flat ironed hair? CURLSSS!! 

My hair is approximately 7 days post flat iron (I try to stretch it as long as possible) and I was just bored of the constant straight look! I wanted some curls and volume without the use of extra heat, so I grabbed my trusty 1" inch satin pillow rollers, my Creme of Nature Argan Oil Setting Foam Lotion and went to work! Side note - if you know me, I'm not a fan of using excessive rollers or flexi rods in my hair to achieve a certain look. I like to take the minimalistic route and use just enough rollers to cover my hair. 

Products/Items I used:

1) Creme of Nature Argan Oil Foam Setting Lotion - I used the Creme of nature foam setting lotion sparingly as I didn't want to saturate my ends to the point of reversion. I used half a pump (or less) per section to set my curls overnight.

2) 1" Satin Pillow Rollers - I used a total of 9 rollers all over. I placed a satin pillow roller in the front of my hair for extra curl and volume to frame my face. For the rest of my head, I placed 4 satin rollers per side (8 rollers in the back and 1 in the front). To achieve the curl, I wrapped my hair around the satin roller, to create that coily "look", starting from the mid shaft first - not the ends.  The satin material prevented my ends from frizz and drying out.          


My Hair Before:


3) Satin Scarf & Bonnet - I covered my hair with a satin scarf to keep my hairline tamed. I then used my bonnet, for extra measures, to keep everything under control while I sleep.

4) Hicks Edge Control - In the morning, I used a little bit of my Hicks edge control to tame my baby hairs down. I used a toothbrush to smooth it down for all day hold.

Here are my results:


I enjoyed this style so much and I must say it was effortless! My curls lasted pretty much all day long, although they dropped slightly. The hold I received from the CON Argan Oil Foam held up pretty well without feeling dry or crunchy. 

As I mentioned before, the satin pillow rollers prevented my hair/ends from drying out, which was a bonus! My hair had bounce, shine and body which is exactly what I wanted to achieve! Most importantly, it's heat free, which means guilt free :)


Have you used satin pillow rollers in your hair? How did you like it?

Video: Day Designer Unboxing

$
0
0

As you know I'm officially a planner addict :)
I made my decision to go with the 2016 Day Designer after much thought, reviews and experience with my previous planner - Kate Spade. I'm truly excited to see what the future holds for me and my new planner. So far, I'm so in love with it and I'm obsessed with the black and white stripes with gold. It's perfect.
Anyways, enough chit-chat, check out my unboxing video!
Thanks for watching!!
Enjoy.

Ways To Improve Scalp Health and the Basics

$
0
0

Scalp health tends to get overlooked and is slightly underrated - why? Because many still carry the misconception that a dirty scalp equates to more growth and longer hair. This is wrong! The truth is, a healthy scalp is the foundation to healthier hair. 

In reality, our scalp doesn't require much! It just needs the basics:
  1. to be thoroughly cleaned  
  2. to be stimulated regularly
It's very important to instill these basic healthy habits when it comes to taking care of your scalp. 


This year I've taken a liking to re-educating myself on scalp health and improving the way I "treat" my scalp on a weekly basis. When I say scalp, I'm also including my edges and hairline in that category. I've never had scalp issues i.e. itchy scalp, dandruff, etc. but I thought I would step my game up - just a little.

Lately, I've been using Shea Moisture African Black Soap Dry Scalp Elixir throughout my scalp (2-3x/week) as it helps to exfoliate and detoxify the scalp helping to remove build up.  We all know less build up means more growth.  If you are one who experiences dryness, itching and soreness in the scalp, this is for you! Nouritress ER Edge Repair Night Drops is formulated to strengthen and stimulate the capillaries that supply blood to the scalp and hair follicles to help nourish weak follicles. I'm testing this out as it's supposed to be great for those who have weak edges.

Now the Scalp Invigorator is another treat to a healthier scalp as it vibrates (when turned on) to lift dead skin cells - get this, it's formulated for the shower! I have yet to use it in the shower with my shampoo, but I have been using it on dry hair as part of my "regular" scalp massage for extra stimulation. Can't wait to try shampooing with it.

If you're as excited as me, save 50% off the Scalp Invigorator! Use code: HAIRLISTA5 at checkout: http://vpwow.com/hairlista5

Do you have a particular scalp regimen? What are you doing to keep your scalp clean and stimulated?

How I Prepare My Hair For Relaxer Day and More - Detailed Overview!

$
0
0


Relaxer day always brings excitement as it only comes 4 times a year! That's right! I only relax 4x/year i.e. Winter, Spring, Summer and Fall using ORS Olive Oil Normal Strength Relaxer (lye). I never started out this way but, over the years, I slowly began to stretch my relaxers from every 8 weeks to every 12-14 weeks. If you aren't there yet, don't worry, stretching your relaxers takes patience and practise. 

So today, I took my relaxer prep and tools to Periscope to share with my Hairlistas a quick run through of how I prep my hair prior to applying my relaxer. If you missed it, check out my twitter page for Relaxer Prep- Quick Run Through videos!


My relaxer prep has by far become one of the most important steps I've incorporated into my healthy hair care regimen, as it has allowed my hair to remain healthy. Here is a detailed breakdown of what I do one(1) week prior to relaxer, relaxer day and one(1) week after my relaxer..

One (1) Week Prior To Relaxer:
  1. I use a clarifying shampoo to rid my hair and scalp of any build up. This allows my new growth to accept the relaxer better.
  2. I follow up with a medium protein reconstructor/treatment for 20 minutes using heat.
  3. I follow up with a  moisturizing deep conditioner to soften and moisturize my strands.
  4. I apply my leave-in and air dry.

Day of Relaxer:


  1. I apply Roux Porosity Control to my entire head, neglecting my new growth, focusing on coating my previously relaxed strands. The Porosity control is pH balanced (pH 4.5); therefore, when in contact with the relaxer, has I'm rinsing it out, it will begin to neutralize the relaxer for me preventing overlap and over-processed hair. In essence, the relaxer will stop working as it touches my ends. Not to mention, because it has so much slip, it helps to detangle my hair. 
  2. I apply the coconut oil over the porosity control, again avoiding my new growth, to aid in separating any knots/tangles in my hair, but to also protect my hair from relaxer run-off. The coconut oil gives my hair a quick treatment prior to neutralizing. 
  3. Jamaican Black Castor Oil is applied to my forehead, temples, ears and the skin around my nape for protection. It works like a charm = no burns!
  4. As "ol skool" as DAX is, its a gem! I use this grease a final step to coat my previously relaxed hair. Because it's petroleum based, the relaxer stands no chance in penetrating through the grease during the relaxer rinse out step. DAX creates a barrier, between my strands and the relaxer, and that is why it will forever be a part of my relaxer prep regimen (the neutralizing shampoo removes all traces of the petrolatum). 
... last step
Taken with my iPhone 6s+

I part my hair from ear to ear. I tackle the front and my sister tackles the back during the relaxer process! I part my hair in one inch sections (approximately) all over, and begin to twist loosely. With this step, I'm able to lift each twist and apply the relaxer directly to my new growth. These sections help in applying the relaxer quickly and effectively. Not to mention, I have more control this way. 


Of course gloves are a must! I love the fact that these latex gloves are cheap and they work on my touchscreen phone aka my timer (25 minutes on the clock!) for my relaxer. My sprushes come in handy when applying my relaxer - no snagging or breakage! Plus my fine tooth-comb glides through my new growth (at the back only!) to straighten it out.

  1. After 25 minutes on the clock, I rinse out my relaxer and follow up with my neutralizing shampoo. I rinse the relaxer out thoroughly and do a quick shampoo to stop the relaxer from processing further. I then lather up again and this time I let the shampoo sit on my hair (just like conditioner) for a total of 5 mins. I do this twice and then follow up with a 10 minute session (i.e. the shampoo sits on my hair for 5 mins, 5 mins and then 10 mins). 
  2. I then follow up with my sulfate free shampoo to restore extra softeness and slip to my hair.


The best part .... deep conditioning! Each relaxer day consists of my ORS Olive Oil Relaxer (lye/normal strength) and my ORS Olive Oil Replenishing Conditioner - awesome combo! The replenishing conditioner gives my hair a great balance of both moisture while restoring strength after a relaxer. I mix a couple of my favourite oils i.e. Coconut oil and JBCO right into my conditioner for an oil treatment. I go straight under the steamer for extra conditioning benefits for 30 minutes. That's it!

I then apply my leave-in conditioner and air dry. Sometimes I pull out my flat iron for a sleek look, other times I just moisturize, seal and do a bouncy braid out!

One (1) Week After Relaxer:
  1. I go back to my regular routine of using a light protein reconstructor on dry hair with coconut oil for 15-20mins with heat. 
  2. Follow up with a sulfate free shampoo. 
  3. Deep condition with a moisturizing deep conditioner, plus oils, for 30 mins. 
  4. Apply my leave-in and air dry! 

All done!!

What is your relaxer day process like? What tips and tricks do you use to prep for your relaxer? or for the day of your relaxer?

Upgraded My Wash Day With My Scalp Invigorator!

$
0
0

Let's face it, sometimes wash day can be a bit mundane as you are doing the same routine over and over and over again, each week! Well.... this wash day I stepped it up a notch by grabbing my scalp invigorator for a quick deep cleaning!

Lately, I've been so focused on stepping up my "scalp game" for a healthier scalp by increasing my scalp stimulation! This session was just the icing on the cake! Not only does the scalp invigorator massage my scalp while I shampoo, it also lifts away dead skin cells so nothing is inhibiting my growth. As a bonus, it's extremely relaxing (OMG).


The vibration is smooth yet powerful while increasing circulation on my entire scalp. It would be nice to see a high and low vibration switch to accommodate those who are tender-headed. I like to use it in small circular motions to prevent tangles. Today, I lathered twice and used it for about 2-3 mins total. This neat little tool will definitely be my "go-to" product to enhance my scalp cleansing and stimulation. Heck, I'll even use it while I'm watching my favourite tv-show to stay on top of my scalp massages :)

Don't waste time! Visit: SCALPINVIGORATOR http://vpwow.com/hairlista5. Use code: HAIRLISTA5 at checkout and enjoy!! ALL my Hairlistas can save 50% off the Scalp Invigorator, go to

Have you tried the Scalp Invigorator? How did you like it?
Viewing all 437 articles
Browse latest View live